Skip to content
Free shipping with $50 purchase. Shop our best selling products now
Free shipping with $50 purchase.

Country

Pizza Oven: 
Quick Start Guide

From unboxing to your first pizza—made simple

1.png__PID:36002bcd-79d2-419a-a203-62461c60b859
What's in the Box

Open the box and make sure all items are included.

  • Pizza Stone
  • Pizza Stone Rack
  • Roasting Rack
  • Enamel Roasting Pan


📌 Tip: The pizza stone should always sit on the stone rack during use.

box_1.png__PID:9f93a5af-e041-47e7-97a2-13c54daa54ce
box_2.png__PID:93a5afe0-4147-47d7-a213-c54daa54cece

Expand your collection. Visit our website to explore more essential accessories.

  • Pizza Peel
  • Pizza Stone Cleaning Brush
  • Cast Iron Grill
  • Protective Cover and more
DISCOVER NOW
Know your Controls
  • Turn to select a function or cooking mode.
  • Short press to confirm, start, or quit.
  • Long press to power off.

Boost Switch (For [Pizza and Custom] Modes)

Temporarily intensify browning on either the top / the bottom of the food independently.

controls.png__PID:e85adcda-90b1-46c9-93ae-d36a8dee7615

Display 1

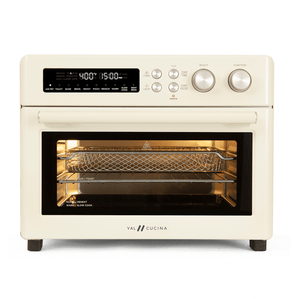
Functions and cooking modes

Display 2

Time, temperature, preheat

  • Rotate to adjust settings.
  • Short press to toggle between temperature and time.
  • Long press to switch between °F and °C
Prepare for First Use

1. Unpack and clean

Remove all packaging materials. Wash and dry all removable accessories (roasting pan, roasting rack).

Warning: Never use water or chemical cleaners on the pizza stone. Wipe it down with dry paper towels.
first_user_1.png__PID:b980c39c-cebf-4f1f-b8ec-7ea0c5a3847c

2. Power connection

Plug unit into a grounded, dedicated circuit.

Warning: Need a 20 Amp Dedicated Circuit. Do not share circuit with other appliances.
first_user_2.png__PID:80c39cce-bf2f-4f38-ac7e-a0c5a3847cd3

3. Insert pizza stone

Place pizza stone on the pizza stone rack and insert into oven.

Warning: Stone always stays on pizza rack!
first_user_3.png__PID:c39ccebf-2f1f-48ec-bea0-c5a3847cd3b0

4. Season your oven

You must season your oven before cooking for the first time. Run [Custom] Mode at 450°F (230°C) for 30 minutes, without food.

Warning: Always wear gloves when putting your hand inside the oven.
first_user_4.png__PID:9ccebf2f-1f38-4c7e-a0c5-a3847cd3b04b
Pizza : Cooking Modes & Temperature Guide

Mode

Description

Default temp.

Temp range

Default Time

Neapolitan

Soft, puffy crust with charred spots authentic Italian style

850°F

700-850°F
370-450°C

2 min

Thin Crust

Crispy, cracker-like base with minimal chew

700°F

550-700°F
290-370°C

4min 30s

New York

Foldable slices with crispybottom and chewy center

610°F

550-700°F
290-370°C

7min

Frozen

Store-bought convenience pizzas

545°F

350-550°F
175-290°C

12min

Pan

Thick, fluffy crust with crispy edges

460°F

400-650°F
200-345°C

15 min

Custom

Your rules, your temperature

400°F

350-850°F
175-450°C

15 min

Ready to make your first Neapolitan pizza?

Follow our pro tips to become the greatest pizza maker. See detailed step-by-step guide below.

Easy Neapolitan Pizza

New to Neapolitan pizza? This recipe keeps things simple. With store-bought dough and clear steps, you’ll learn the basics and make a great pizza on your first try.

Time:3.5 Hours (mostly hands-off)

Yield:1 Pizza (12-inch)

Skill:Beginner-Friendly

Ingredients & tools

Ingredients

  • Trader Joe's Pizza Dough (~250g)
  • Pizza Sauce
  • Flour/Semolina (for the table and the peel)
  • Dry Mozzarella
  • Fresh Basil
easy_pizza_1.png__PID:ae91aa0e-6002-4646-b8eb-46904c5b6d00

Tools

  • Rolling Pin
  • Pizza Peel
  • Pizza Cutter
easy_pizza_2.png__PID:91aa0e60-0206-4638-ab46-904c5b6d00de

You can customize your toppings as you like—just avoid overloading for best results.

Instructions

1. Wake up the dough

Place dough in a covered bowl for at least 4 hours at room temperature 77-86°F (25-30°C). This makes it easier to stretch.

PRO TIP: Don't over-knead or aggressively work the dough-it will tighten up and become difficult to stretch.
PRO TIP: Your dough is ready when it has doubled in size.
easy_pizza_instruction_1.png__PID:2cc04b86-56f5-4625-89e5-0cf7fbd95a5a

2. Fire up the oven

Select [Neapolitan] Mode (850°F). Preheat for about 25 min.

image.png__PID:1af1ce80-0314-4110-9f49-67154d3f79ba

3. Flour the dough

Generously coat the dough ball in flour/semolina.

PRO TIP: Sticky? Don't be shy with the flour. Coat the dough and your work surface really well.
image1.png__PID:2138bb79-2a88-4da6-95ab-3d2ebe2c3e3f

4. Roll out the dough

Flatten the dough into a 12-inch circle.

PRO TIP: Can't toss pizza like a pro? No worries. Just use a rolling pin.
image2.png__PID:f48cc293-8a0c-4dc3-b473-1c8db52ea3bd

5. Prep the peel

Cover your pizza peel generously with semolina. Slide the pizza dough onto a pizza peel.

image3.png__PID:2247f337-2afb-41bf-897e-1d32c32f5f0c

6. Layer your toppings

Spread a thin layer of sauce, add cheese and basil.

image4.png__PID:4d8eb99f-4a8b-4657-8c13-d8bfa9689623

7. Move and shake

Gently shake the peel. If the pizza slides, launch it!

image5.png__PID:e38193da-4e54-4c25-aea7-b770691e32ed

8. Launch the pizza

Slide the pizza onto the hot stone in the oven. Be quick and confident. Bake for 90 to 120 seconds. Keep your eyes on it!

PRO TIP: Our oven's even heat distribution means no spinning needed. Just watch and wait for perfection.
image6.png__PID:174b263d-3151-47c8-9b76-0bf778dff975

9. Ready to Remove

Pull it out when the crust is charred and cheese is bubbly. Slice and enjoy!

PRO TIP: Cooking multiple pizzas? Check 'Auto Temperature Recovery' feature for consistent results.
image7.png__PID:5cf32b38-2165-4339-8ea1-df262768efae
Pro Features

Auto Temperature Recovery

When you:

Make multiple pizzas back-to-back, the oven automatically monitors internal temperature to ensure consistent results for every pizza.

What to expect:

When the PREHEAT light flashes, be patient-the oven is automatically returning to optimal cooking temperature.

PRO TIP: Keep the oven door closed between pizzas to minimize recovery time.
11.png__PID:81a8d77d-0cb8-4119-9e3e-a0ebe3d93b34

Boost Function For [PIZZA]/[CUSTOM] Mode

image8.png__PID:6f1ce211-66b9-42ce-91f7-3681c5e13422
image9.png__PID:ec4244f4-0de2-4344-abfd-85fd102943b8
image10.png__PID:c468db11-dbb1-4d0d-880c-b5c8e12984a6
image11.png__PID:3a3b24b7-52b3-47a0-9c1e-ebae7f994e24
image12.png__PID:dc08ebee-a47a-4115-9440-ad50cd010f92

How it works:

Boost supercharges the top or bottom heating element for 60 seconds, giving you the perfect finishing touch.

17.png__PID:8a21402d-09b6-49cc-9353-24bf4b1246bf

How to use:

Once the oven completes preheating and the Yellow Boost light turns on, use the toggle switch to activate it.

18.png__PID:402d09b6-f9cc-4353-a4bf-4b1246bf2735
PRO TIP: For safety, the oven will enter a recovery period after multiple Boost cycles.
Cooking Modes: Beyond Pizza

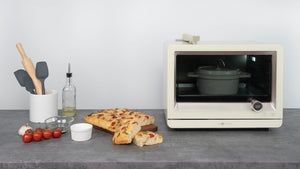
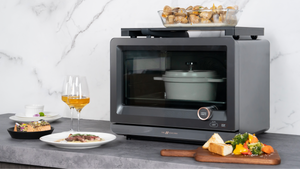
There’s more to this oven than great pizza. From roasting and baking to broiling and warming, these modes let you explore a wide range of dishes with the same high-performance heat.

Mode

Description

Temp range

Broil

Adjustable intensity for melting cheese or searing steaks

Lo/H1/H2

Roast

Perfect for meats & vegetables

200-650°F/95-340°C

Bake

Ideal for breads & pastries

200-650°F/95-340°C

Warm

Keep food at serving temperature

150-300°F/65-150°C

Try these recipes

WARNING: Recommended for outdoor use. If cooking fatty foods indoors, keep the temperature BELOW 480°F (250°C) & ensure proper ventilation to prevent smoke alarms from triggering.
a.png__PID:2c7bd8b0-d990-4773-aab2-58d0d82a3eff

Roasted Spatchcock Chicken

Time: 45-60 minutes
Mode: Roast, 425°F (220°C)
Serves: 4:

What you need:

  • Whole chicken (3-4 lbs), spatchcocked
  • Olive oil, salt, pepper, herbs
  • Roasting Pan & Rack (included)

Steps:

  • Season chicken generously
  • Place on roasting pan, skin-side up
  • Roast at 425°F for 45-60 minutes
  • Rest 10 minutes before carving
PRO TIP: Spatchcocking ensures even cooking and crispy skin!
b.png__PID:74b982ac-9997-44c1-8c49-c956ec58658f

Seared Steak and Roasted Veggies

Time: 20-25 minutes
Mode: Broil (H2) + Roast, 500°F (280°C)
Serves: 2

What you need:

  • Ribeye or NY strip steaks
  • Seasonal vegetables (peppers,
    zucchini, onions)
  • Val Cucina Cast Iron Grill Pan (sold separately)

Steps:

  • Preheat grill pan in oven at 500°F
  • Sear steaks on [Broil H2], 3 mins/side
  • Add vegetables, roast 12-15 minutes
  • Rest steak 5 minutes before serving
9.png__PID:309b51b0-6560-49aa-9bc3-b67a0d62b70e

Buy Val Cucina Cast Iron Grill Pan

c.png__PID:82ac9997-b4c1-4c49-8956-ec58658feab5

Crispy Baguette with Trader Joe's
Pizza Dough

Time: 3+ hours (mostly resting)
Mode: Bake, 650°F (340°C)
Serves: 2 baguettes

What you need:

  • Trader Joe's Pizza Dough (1 package)
  • Olive oil for coating
  • Flour/Semolina for dusting
  • Sauce Pot with water (sold separately)

Steps:

  • Divide dough into 200g portions
  • Rest in oil-coated bowl for 2 hour
  • Roll each to 2" diameter(prevents
    touching heating element)
  • Rest at room temp for another 2 hours
  • Fill sauce pot with water for steam
  • Bake at 500°F for 15 minutes
PRO TIP: Keep diameter at 2“ to avoid heating elements.
Care & Maintenance

Regular care helps your oven perform at its best and last longer. Follow these simple cleaning and maintenance steps to keep your oven safe, efficient, and ready for every cook.

Important Safety Warnings:

  • Always unplug and allow oven to cool completely before cleaning
  • Never immerse the oven in water or any liquid
  • Do not use abrasive cleaners, steel wool, or harsh chemicals
  • Never spray cleaning products directly onto the oven
  • Keep the oven away from water sources during cleaning
warns

Interior Cleaning

After Every Use:

  • Let oven cool completely (at least 30 minutes)
  • Remove loose debris with dry brush or cloth
  • Wipe interior surfaces with damp cloth
  • Dry thoroughly before next use
use

Weekly Deep Clean:

  • Remove all accessories (pizza stone, racks, pans)
  • Brush away carbon buildup from ceiling and walls
  • Use damp cloth with mild soap for stubborn spots
  • Wipe heating elements gently (never scrub)
  • Ensure everything is completely dry
6.png__PID:b8ef7575-46e8-4289-adba-39e8a8575746
PRO TIP: A little carbon buildup is normal and won't affect performance. Focus on removing loose debris.

Pizza Stone Care

Important Safety Warnings:

  • NEVER use water or chemical cleaners on the pizza stone
  • NEVER wash the stone with soap
  • NEVER immerse in water
7.png__PID:53b93cba-aed3-40f7-a793-8559a70a40ac

Proper Cleaning Method:

  • Let stone cool completely in the oven.
  • Remove loose debris with dry brush.
  • Wipe down with dry paper towels only.
  • For stubborn spots, use stone scraper when cool.
  • Store stone in oven on rack.

(GET: Val Cucina Pizza Stone Brush and Dustpan)

What’s Normal:

  • Dark spots and discoloration are normal.
  • Stone will darken with use (this is seasoning).
  • Small cracks are normal and won't affect performance.
8.png__PID:95f85cb0-a2d6-4fad-93c2-effba414d290
PRO TIP: The darker your stone gets, the better it performs. Embrace the patina!
Warranty Registration

Your culinary journey deserves peace of mind

You've invested in quality. Now protect it. Scan the QR code below to register your Val Cucina High Temperature Oven and unlock exclusive extended warranty benefits.

Why register today?

Extended Protection
Enjoy additional coverage beyond the standard warranty period. Cook with confidence knowing you're protected.

Priority Support
Get faster response times and dedicated assistance from our customer care whenever you need help.

Proof of Ownership
Secure digital record of your purchase for hassle-free claims and support

PRO TIP: It takes less than 2 minutes. Your future self will thank you.
Scan to register your warranty

Scan to Register
valcucina.com/pages/warranty

Join thousands of satisfied Val Cucina owners who've already registered.
Start your protected culinary journey today!

Questions? Contact us at service@valcucina.com or visit valcucina.com/pages/contactus

Compare products

{"one"=>"Select 2 or 3 items to compare", "other"=>"{{ count }} of 3 items selected"}

Select first item to compare

Select second item to compare

Select third item to compare

Compare